
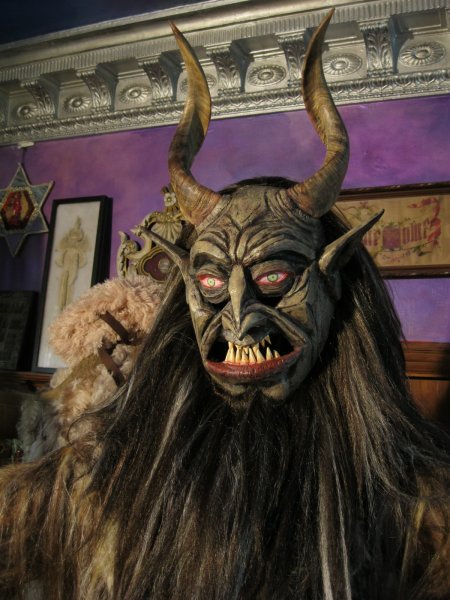
A second mask I’ll be sending out on the streets of LA this December. Thumbnails show construction process. Note that curved plastic conduit served as base over which hollow goat horns can be easily be positioned in a variety of trial positions (three variations shown). Cardboard and hot-glue build up basic shape, strengthened by a coating of mixed resin and Bondo. Some epoxy putty details, fine line and texture provided by dremel, a few layers of dry-brushed color, and it’s ready for a mane of custom-sewn hair wefts.
— Krampus Ridenour


Very cool Thanks for posting this…!
Ray Hartenstine
I’m currently building a mask and wanted to follow your basic approach. A couple of questions if you don’t mind…
1) Is the base shape a larger paper mache’d balloon? Looks about like it.
2) In picture #2, it looks like you’ve made a face guide to align where your eyes, nose, & mouth are – correct?
3) How’s the visibility from the slits below the eyes?
4) Anything you’d change in hind sight?
Hi Tim. Good luck with your mask!
1) The white roundish thing in picture #6 — the base shape — honestly, was just some cardstock taped around the mannequin head just to create more of a blank field to help visualize the features. Mainly I just did it to help me quit looking at the mannequin’s eyes and succumb to the impulse to create the mask’s eyes where the mannequin’s eyes were (instead of OVER the eyes). You could probably just as well or better use the paper mache’d balloon ideal as a starting point — to mask the face — certainly not to support anything.
2) Yes.
3) Visibility is slightly limited, but it helps give the head an oversized appearance, and is the most common, traditional way to place eye-slits.
4) Probably, but doesn’t occur to me at the moment.
Thanks! Oh also what did you use to anchor the horn to the PVC? I was thinking expanding foam.
Just got a set of goat horns via eBay. Cheap, but need to boil them to remove the inner bone from sheath. Oh the things we do for Krampus…
Expanding foam wouldn’t really be strong enough. Would advvise against it. Used curved PVC pipe fittings, which can be adjusted to a variety of angles, then a screw through horn and and pipe to hold them together.
Nice and simple – thanks.
Hopefully I can get these horns cleaned up inside. I shook 8-10 beetles/bugs out of the ends of them and would rather not have such critters crawling out and into my mask…
Found this art post today that reminds me of the built up mask approach with cardboard…
http://jacquioakley.com/boar-fox-masks
Pingback: A Last Minute Guide to Krampus -